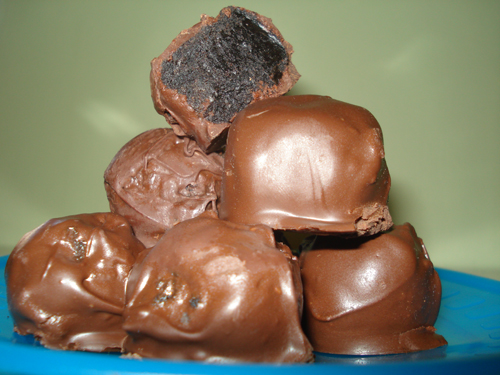
 My friend Lyndsey is a vegan. Her birthday party was this weekend. Oh, the conundrum! Birthdays practically demand sugary, dairy-laden sweets, but Lyndsey couldn’t eat any of it!
How could I get around this issue?
Well, after learning that Oreos are vegan friendly* (they no longer contain whey, and yes, if you’re wondering what the creme filling is made of, you’re not alone), I decided to take a non-dairy approach to Bakerella’s Oreo truffles.
The verdict: People couldn’t stop eating them! Even days afterward I’ve been getting comments and texts asking if I have any more left. They’re that good.
For a more in-depth tutorial, check out our how-to video.
*NOTE: There is some questioning whether the sugar in Oreos is truly vegan, since Nabisco hasn’t disclosed whether the sugar is filtered using bone char (a common process). Many organizations, such as PETA, consider Oreos vegan. Out of concern that bone char may be used, some people will not eat them. If you’re in the latter camp, you may want to stick with Newman-Os, since the company doesn’t use bone char to process its sugar.
Utensils required: spoonula, resealable bag(s), spoon, microwave, mixing bowl, baking sheet, sheet of wax paper, freezer, microwave-safe bowl
Ingredients:
– 8 ounces vegan cream cheese
– 1 package of Oreos, Newman-Os or any sandwich cookie that doesn’t contain whey powder or other dairy products
– 1 bag (12 ounces) semisweet vegan chocolate chips
– 2 tablespoons canola oil (optional, yet recommended)
Time commitment: 20-25 minutes to prepare, 20-25 minutes to cool
Steps (makes about 3 dozen):
1. First, grab a few Oreos and place them in the resealable bag. Squeeze out any excess air and seal it shut.
2. Now, take that spoon and use it to smash up the Oreos, grinding them into as fine a powder as you can muster. Repeat this process until all of the cookies have crumbled.
3. Pour the crumbles into a mixing bowl and stir in the vegan cream cheese. Once it forms a dough, use your fingers to roll it into one-inch balls. Then place each ball on the wax-paper-lined baking sheet. (They can be as close as you can squeeze ’em, as long as they’re not touching.)
4. Next, stick them in the freezer for 15-20 minutes to harden. This will make keep the truffles from crumbling when dipped in the melted chocolate. Just a minute or two before you take out the truffles, pour the chocolate chips into a microwave-safe bowl, and place them in the microwave for 30 seconds. When they’re done, use a spoon to stir it around. If the mixture looks thick and lumpy, add in the canola oil and microwave it for another 15-20 seconds before taking it out and stirring it again. (The canola oil isn’t necessary, but it will thin the chocolate and make it easier to coat the truffles. It’ll also make the chocolate last a lot longer.)
5. Take the truffles out of the freezer and, one by one, dip them in chocolate. Use the spoon to help coat the truffles. Be sure to let the excess chocolate drip off each truffle before placing it back in the baking sheet.
6. Finally, put the baking sheet o’ truffles back in the freezer for five more minutes, giving the chocolate coating just enough time to harden.
7. Try not to eat them all before you arrive at your destination. (Trust me, it’s hard!)
Vegan Cookies & “Cream” Truffles from Candace Braun on Vimeo.

[…] January 11th: No-Bake Chocolate Truffles […]
[…] to treat yourself and can’t use more than a microwave, I reasoned. Or, better yet, make some no-bake Oreo or Cookie Dough […]