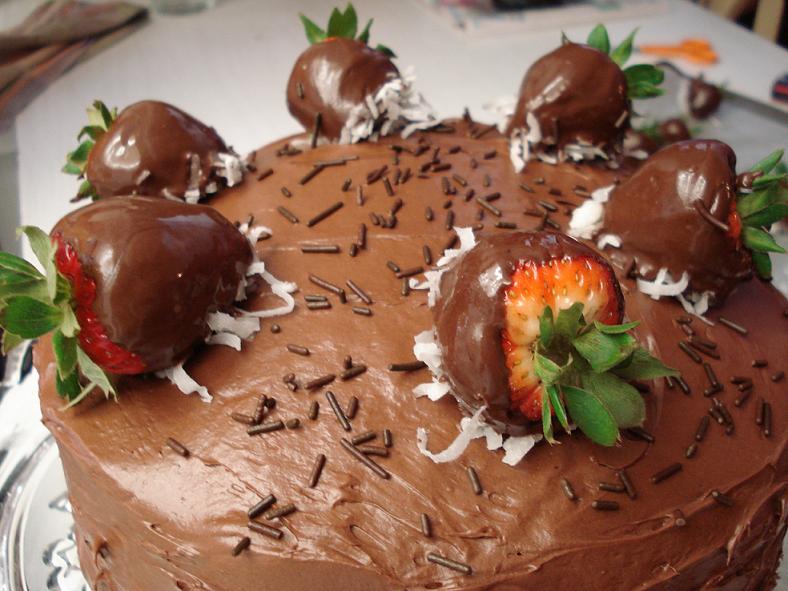
 Here’s an elegant cake that doesn’t take hours to make. In fact, it’ll look so good that people may start rummaging through your trash cans and garbage bins looking for a bakery box.
(Of course, the grocery-store shortcuts used to create this masterpiece can be our little secret.)
Utensils required: two eight-inch or nine-inch round baking pans (you can sub in a 9″x13″ and just cut the baked cake into two halves and stack ’em instead, if that’s easier), oven, mixing bowl, 1 small microwave-safe bowl, spoonula, butter knife, microwave, oven mitts, 3 plates (one for the coconut, one for the cake and one for holding the cooling strawberries), hand mixer, refridgerator
Ingredients:
– 4-6 strawberries, washed
– 1 cup of semi-sweet chocolate chips
– 2 tablespoons of butter
– 1 cup of shredded coconut (optional)
– 1 can of whipped chocolate frosting (for a light and fluffy taste; for a richer, more ganache-like flavor, try fudgy dark chocolate)
– 1 can of whipped strawberry frosting (any strawberry kind will do; I just prefer the lightness of the whipped variety)
– 1 box of Duncan Hines Classic Yellow cake mix (the kind that uses oil, not butter – it’s the moistest, most flavorful box mix I’ve found)
– Whatever ingredients your cake mix requires (the Duncan Hines Classic Yellow mix calls for 3 large eggs, 1 1/3 cups water and 1/3 cup vegetable oil)
– Pam for baking, or a tablespoon of butter and a 1/4 cup of flour (for coating the bottom and sides of your baking pans so the cake slides out easily)
Time commitment: 30-36 minutes to bake, 15-20 minutes to decorate
Steps:
1. Preheat the oven to 350 degrees, or whatever your cake mix requires.
2. While the oven’s heating, prepare the cake mix according to the box’s directions. Make sure you coat the sides and bottom of the pans with Pam or butter and flour so the cake will come out easily. Nobody wants to deal with a crumbled, messy cake!
3. As the cake bakes, show off your sweet multitasking skills. Pour the chocolate chips and 1 tablespoon of butter in a microwave-safe bowl and heat it in the microwave for one minute. Take it out, stir the mix and add in the other tablespoon of butter, then heat it for another 30 seconds. Repeat until the chocolate is smooth and creamy.
Watch out: If you overcook the chocolate, it’ll start looking gritty and grainy.
4. Pour the shredded coconut onto a small plate, then take out the strawberries and wash them thoroughly.
5. Hold onto the stem of the strawberry and gently dip it in the chocolate, swirling it around so that all sides are covered. Then, lightly press one side of the strawberry into the coconut. Set each completed strawberry onto the clean plate. Once all the strawberries have been dipped, let them cool in the refridgerator while you tend to the rest of the cake.
6. Stick a toothpick in the cake to make sure it’s done. If it comes out clean, it’s ready to go. If you don’t have a toothpick, just make sure you follow the mix’s cooking directions. You can stick the butter knife into one to check it. The top should be a light, golden shade.
7. Let the cake cool until it reaches room temperature. This could take anywhere from 15-25 minutes. (I use this time to clean up the kitchen.)
8. Once the cake has cooled, place one half on a plate. Then, apply a light coating of strawberry frosting to the top of the cake only. (If you’d like, cut a strawberry or two into small slices and stir it into the frosting for extra strawberry flavor.) Keep the layer of frosting less than half an inch thick, otherwise the top half of the cake will slide off!
9. Gently lower the other half of the cake on top of the strawberry-coated one. Cover the cake with chocolate frosting.
10. Touch one of the strawberries — does the chocolate dent in? If not, they’re ready to be artfully placed on the cake. Just toss on a few chocolate sprinkles and voila! A lovely, professional-looking cake without any of the hassle!

